This is a continuation of seven articles on Photoshop CS4, Adobe Camera Raw.
White Balance, Targeted Adjustment, Crop, Straighten, Spot and Red Eye Removal
Adjustment Brush, Graduated Filter, Preferences The Histogram, Basic Adjustments
Curves, Sharpening, Noise Reduction Grayscale, Black And White, Split Toning
Lens Corrections, Camera Calibration Examples Of Usage
The Histogram
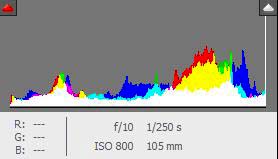
The Adobe Camera Raw Histogram is generally an indication of correct exposure. The left side of the Histogram should indicate pure black and the right side should indicate pure white. A perfect Histogram will not have any of the Histogram content extending beyond the right or left edges. Some contact with the edges is sometime unavoidable, however if it is too much some of the content of the image will be lost.

RGB Values
Also underneath the Histogram the RGB (Red, Green, Blue) values will be indicated for the specific position of the mouse at that time.
Camera Settings
Some camera settings are also indicated under the Histogram as follows:
- Aperture
- Shutter Speed
- ISO
- Lens focal length
Basic Tab
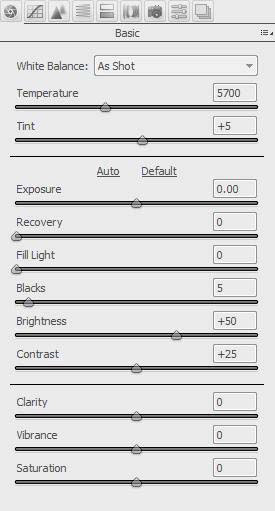
I will now outline the adjustment which are available when the Basic Tab is selected. A screen shot of the Basic Tab options nis shown below.

White Balance
If your original image is shot in raw it will give you much more flexibility in adjusting the White Balance. The following preset options are available for adjusting the White Balance.
- As Shot – This is the White Balance suggested by the camera.
- Auto – With this setting Adobe Camera Raw will make a suggested setting for you.
- Daylight – Adjusts for daylight.
- Cloudy – Adjusts for cloudy lighting.
- Shade – Adjusts for shade.
- Tungsten – Adjusts for tungsten color temperature lighting.
- Fluorescent – Adjusts for fluorescent colored lights.
- Flash – Adjusts for electronic flash color temperature.
- Custom -The custom setting allows you to use the two sliders (Temperature/Tint) below the presets to fine tuning of the Color Balance.
Also do not forget that there is another Color Balance adjustment on the tool bar at the top of the Adobe Camera Raw window.
Temperature
The temperature slider is a fine tuning adjustment to adjust the Color Temperature to a specific value in Degrees which is indicated above the temperature slider.
Tint
The Tint slider fine tunes the white balance to compensate for a green or magenta tint. Decreasing the Tint to add green to the image and increasing the Tint to add magenta to the image.
Exposure
In general the exposure from your camera should be just about perfect, however there is a capability with the Exposure slider to to make finely tuned Exposure adjustments.
Recovery
The Recovery slider works on the highlights of the image and is great to bring out details of burnt out highlights. It does this by shifting to the left on the histogram the highlights.
Fill Light
The Fill Light slider is very effective to fill the shadows and by adjusting this slider more detail can be brought out in the dark shadow areas of the image. Using both the Recovery and Fill Light together, effectively pinches the histogram together at each end and can give unrealistic tones in the image when used excessively.
Blacks
This slider is to control the amount of Black in the image. The default Adobe setting is 5, any higher value will create more black in the image, however be carefull that it is not adjusted too high.
Brightness
The Brightness slider is different to the exposure slider in that with the brightness slider the entire histogram is moved to the right or left. It is best to set the shadow and highlight detail before using the Brightness slider.
Contrast
This is an importants slider to get right, but as you adjust the slider keep your eye on the histogram to ensure that you do not clip any information (the shadows and highlights) from the image.
Clarity
The clarity slider will give an image the appearance that it has greater sharpness and detail. It works on the edges of detail in the image and lightens the light side of edges and darkens the dark side of edges, thus increasing the contrast between the edges. In using many of these sliders it is best to view the image at 100% to get the best results with the adjustment.
Vibrance
The Vibrance tool is a color saturation adjustment tool but it increases the color saturation of highly saturated colors less than it increases the color saturation of lower saturated colors.
Saturation
The saturation adjustment increases the saturation of all colors to an equal degree.
This article is continued in seven parts as follows.
White Balance, Targeted Adjustment, Crop, Straighten, Spot and Red Eye Removal
Adjustment Brush, Graduated Filter, Preferences The Histogram, Basic Adjustments
Curves, Sharpening, Noise Reduction Grayscale, Black And White, Split Toning
Lens Corrections, Camera Calibration Examples Of Usage
