This is a continuation of seven articles on Photoshop CS4, Adobe Camera Raw.
White Balance, Targeted Adjustment, Crop, Straighten, Spot and Red Eye Removal
Adjustment Brush, Graduated Filter, Preferences The Histogram, Basic Adjustments
Curves, Sharpening, Noise Reduction Grayscale, Black And White, Split Toning
Lens Corrections, Camera Calibration Examples Of Usage
Lens Corrections Tab
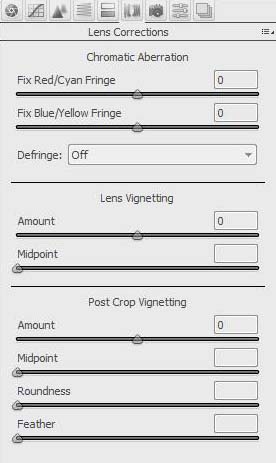
The lens correction Tab offers fixes to some of the common lens performance issues. Some of these lens performance issues are more common with cheaper lenses.

Chromatic Aberation
Here options are available to correct the following issues.
- Fix Red/Cyan Fringe
- Fix Blue/Yellow Fringe
- Defringe Options – Off/Highlight Edges/All Edges
Some of the above lens problems become more evident with subjects closer to the edge of the lens. If you enlarge your image to 100% these fringing issues will become more evident.
Defringe Options – Off/Highlight Edges/All Edges
Lens Vignetting
Lens vignetting is characterized by darkening around the corners and edges of a lens, the following settings are available to correct these issues.
- Amount
- Midpoint
Post Crop Vignetting
Post crop vignetting can be corrected using these options.
- Amount
- Midpoint
- Roundness
- Feather
Camera Calibration Tab
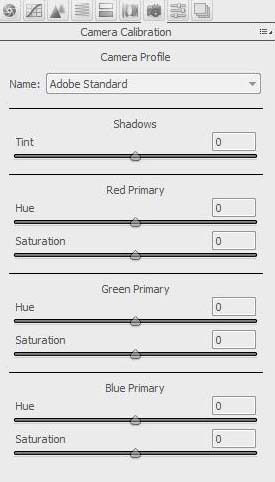
The camera Calibration Tab enables special profiles to be implemented to acheive appropriate results. These profiles are quite a specialist application.

Camera Profile
Some camera profiles available are as follows. Some of these may be worth trying.
- ACR4.6
- Adobe Standard
- Camera D2X Mode 1
- Camera D2X Mode 2
- Camera D2X Mode 3
- Camera Landscape
- Camera Neutral
- Camera Portrait
- Camera Standard
- Camera Vivid
Also additional options are available as shown below.
Shadows – Tint
Red Primary – Hue/Saturation
Green Primary – Hue/Saturation
Blue Primary – Hue/Saturation
Presets
This Tab enables you to store settings so that they can be applied to other images. This is really only appropriate if all images are very similar. Click on the icon at the right of the Presets header and the available options will open. You can use a selection of image settings, you can also save the current settings or load previously saved settings.
Snapshots
The Snapshots feature lets you save adjustments you have made and save them for future use. Too save a snapshot click the icon at the bottom of the Snapshot sidebar and give the Snapshot a name. These can be retreived and used at a later time.
This article is continued in seven parts as follows.
White Balance, Targeted Adjustment, Crop, Straighten, Spot and Red Eye Removal
Adjustment Brush, Graduated Filter, Preferences The Histogram, Basic Adjustments
Curves, Sharpening, Noise Reduction Grayscale, Black And White, Split Toning
Lens Corrections, Camera Calibration Examples Of Usage
